Tuesday, April 7, 2015

Homemade "saltine"


It was a crazy week last week. Weather's finally becoming more appropriate for the season and I had so many late nights. Thankfully not late nights due to the tot waking up, those nights were voluntarily planned by me. I can't remember the last time I was out till close to midnight! Great fun week but by the time Sunday Easter brunch was over, I just passed out. Haha. Not going to happen again for a while I guess.

As I mentioned a few times before, my tot loves all things crispy. And he loves saltines. I love experimenting homemade commercial snacks. After trying homemade goldfish/cheese crackers, oreos and so on, saltine was my next project in mind. When I found this recipe, I tried right away as it's so simple. The only thing that needs effort is rolling out the dough thin. We have a pasta maker so I could just feed the dough through and it wasn't that big of a deal but if I didn't, it would be a lot of work. I like how the bubbled up parts are so crispy. 


The reason why I call this "saltine" or saltine-like crackers is, it is not EXACTLY like saltine but it definitely taste like saltine. Texture is slightly different. Maybe because they're too thin? Would not making holes makes make a difference? I don't know but these were pretty darn good and addictive. It might sound funny but I like my saltine with some berry jam. Dip these in a little jam for a little sweetness or snack on them as is. Simple ingredients and my tot couldn't stop munching on these. At least I know what exactly is in it. Whether you want something simple homemade snack to munch on or to serve it with cheese for the guests, I think this will work very well. I didn't mean to scare you by saying it needs effort, if you roll it out as a couple of large sheets, it won't be that much of work. And your patience will be well worth it!

Homemade "saltine"


Ingredients :

1 cup all purpose flour
2 Tbsp unsalted butter, melted
1/4 cup water
1/2 tsp kosher salt
water for brushing
salt for sprinkling

Directions :

1. In a food processor, pulse the flour and salt. Add melted butter and pulse until it resembles coarse meal.

2. Add water and pulse until dough is formed. Dough will still be on the crumbly side. Put them on a clean surface and knead to make a moist dough disk.

3. Rest the dough for 30-60 minutes.

4. Preheat the oven to 400F and roll out the dough very thin. Cut into squares and place them on a parchment paper lined sheet pans and brush the top with water. Sprinkle salt evenly.

5. Bake for 8-10 minutes or until golden brown. They crisp up more as they cool. Keep in airtight container. 

*Recipe by stress cake.

Thursday, March 26, 2015

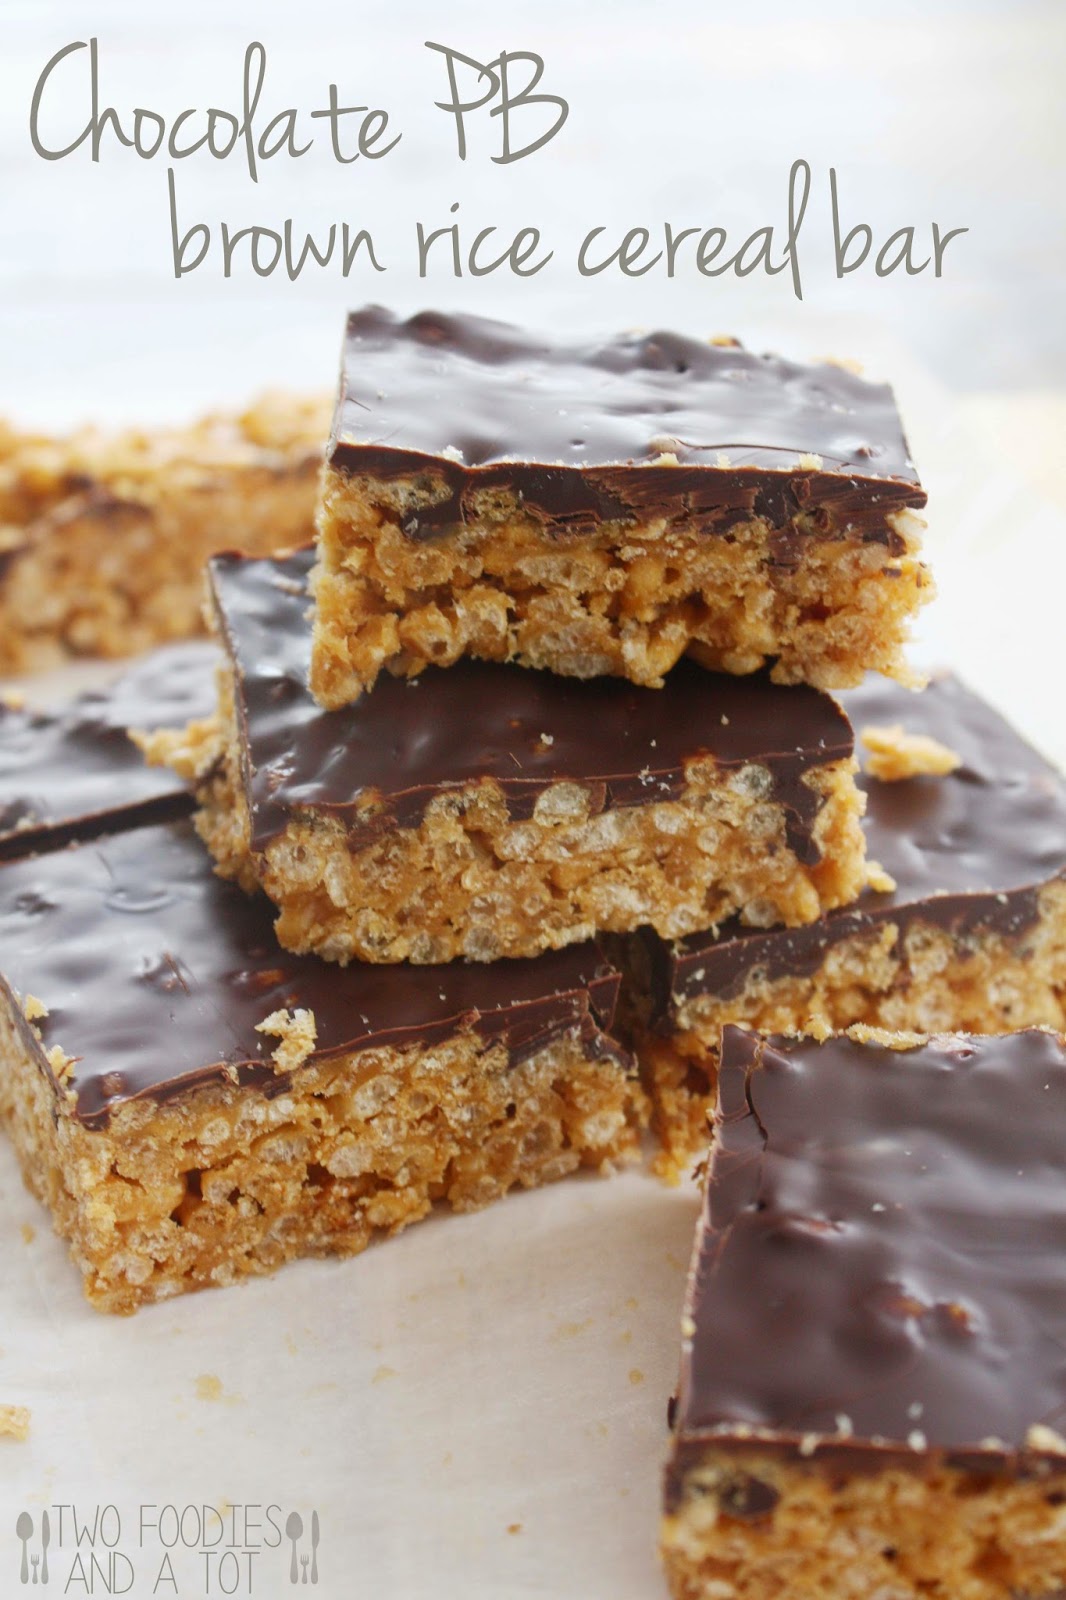
Chocolate peanut butter brown rice cereal bar


A few days ago, I went to my favorite local cafe called Sook. They have the best pastries and cakes in town. So glad I found this place. Not a lot of places makes the perfect earl grey chocolate mousse cake and they do. Enough reason to stop by often. There was(or maybe still is) a pastry cafe at one of the Hyatt hotels in Dubai that I used to go to all the time and they had the perfect earl grey chocolate mousse cake. Even in Europe, I haven't had that kind of perfection. Slightly crunchy middle, rich and smooth mousse with a hint of fragrant earl grey. Ever since I left Dubai, I have been on a search for that perfect bite but no luck, not even in NYC. Until I found this place. 

They open at 6am everyday so my tot and I like going there for breakfast at like 7-730am. Crazy but whoever has a toddler knows breakfast can easily happen at 7am. Even at that early hour, this place is busy. Commuters picking up their coffee and pastry and people like me. Going for a peaceful and enjoyable breakfast when not a lot of people are around since I was dragged out of my bed by a 3yr old anyway. 


The other day was a different story though. It was my mistake that I went in at 9:30 which is exactly when everyone's done dropping off their kids at school. There was one last table left in the sunny corner. Fine, I miss the sun. But no wonder that was the only table left! I probably came out with some good color on my face. Direct sunlight on me. Cafe full of loud people. ARGH! Get me out of here! I left as soon as I finished my coffee which is very unusual. 


That was one of the crazy mornings I had this week. And I'm so glad it's almost weekend. Although, believe it or not, there's a chance of snow here on Saturday. Not excited about that. 

 Anyway, Steve recently said I haven't made peanut butter dessert lately. So I was on it. We always have brown rice cereal at home and decided to make some bars with them. And I found this perfectly quick and easy recipe which only calls for whatever I had in the pantry. I made a little portion without chocolate topping thinking I'd give it to my tot but of course I ended up eating it because he demanded chocolate one. If your child doesn't see the chocolate part, you're pretty safe. It's so good either way. I keep the bars in the fridge and take some out as needed rather than keeping them room temperature for a little extra crunch. 

Chocolate peanut butter brown rice cereal bar


Ingredients :

1/3 cup peanut butter(or any nut butter)
1/4 cup brown rice syrup
1 Tbsp maple syrup
2 tsp vanilla extract
2 cups brown rice cereal(I use unsweetened wholefoods brand)
1/2 cup chocolate chips(dark or milk, depending on your preference)

Directions :

1. In a sauce pot, mix peanut butter, brown rice syrup and maple syrup and melt over low heat. Just when it starts to bubble turn off the heat. Add vanilla extract. 

2. Add brown rice cereal and stir well so it's well mixed. 

3. On a parchment paper lined pan, place the whole mixture and pat into desired shape. Let it cool for about 10 minutes.

4. Melt the chocolate and spread on top of the bar. Refrigerate for an hour or so and cut into bars. Enjoy!

*I find them tastier when kept in the fridge. You can keep them in an airtight container for about a week. 

*Recipe from Texan Erin.

Tuesday, March 24, 2015

Coconut chicken strips with honey mango sauce


We made our monthly trip to Costco last weekend and bought beautiful peaches and mangoes. Oh my gosh, those peaches were just so delicious and juicy, I finished all 8 of them in a box in just a couple of days without knowing. And Mangoes took a little longer to ripe so I finally cut them open a few days ago. Those were so yummy too! But unlike peaches, even though we love mangoes, I just can't eat many of them at one seating. Does a mango have more calories than a peach? I don't know..so we needed to use it up in different ways too. I mean I can always freeze it but they were too good to go in the freezer. 


So I started to look for mango recipes. When I found this honey mango sauce recipe, I knew it's right up our alley. My tot loves dipping like any kids. When we make chicken dish, we usually use Thai chili sauce but chicken and mango goes so nicely together, I couldn't resist. And it's super easy. Dump everything and blend, and there, you have a beautiful creamy mango-y sauce. My tot actually made the sauce. While saying, "I am cooking like a chef!". Then he's so proud of himself when he eats whatever he made. =)


I thought about baking them but I wanted to guarantee the crispiness, so I went somewhere in the middle. Pan frying. We cleaned the plate so quickly. With some blenched veggies since the dip is so yummy. One thing that makes me wonder is, why is the dip not bright yellow? Original recipe seems to have a beautiful bright yellow. Maybe frozen mangoes have better color? I don't know. It surely had a lot of mango in it and fragrant, it was just the color. This time I used unsweetened coconut but maybe next time, I'll try sweetened shredded coconut and see if it makes a big difference. It would have been even more perfect, if I could have a sip of mango-tini to go with it. Mmm...just a couple more months.. =)

Coconut chicken strips with honey mango sauce


Ingredients :

2 chicken breasts, cut into strips(about 12-15 strips total)
pinch of curry powder
1/2 tsp smoked paprika
salt and pepper to taste
1/2 cup flour
2 eggs, beaten
2 cups shredded coconut(sweetened or unsweetened)
1 Tbsp chopped parsley
Vegetable oil to fry

honey mango sauce
1/2 cup mayo
1/2 cup mango(fresh or if frozen, thawed)
2 Tbsp fresh flat leave parsley
1 Tbsp honey
1/8 tsp curry powder
1 tsp sririacha(optional - or more if you want more kick)
1/2 tsp lemon juice

Directions :

1. Season the chicken with salt, pepper, curry powder and paprika.

2. Coat the chicken strips with flour, then egg then shredded coconut pressing it down. Heat up the oil and either deep fry or pan fry. Cook the chicken for 2-3 minutes or until done and golden brown.

3. As soon as you take the chicken out of the oil, sprinkle chopped parsley, salt and pepper. 

4. Make honey mango sauce - In a food processor, add all the ingredients together and blend. 

5. Serve immediately. If heating up, toasting using a toaster oven works very well. 

*Adapted from the cozy apron.

Friday, March 20, 2015

Greek yogurt chocolate cupcakes


First day of spring today- well technically this evening, so not yet. And so much for that. It's snowing and local schools in my area has early dismissal. WHAT?! Yeah..it's crazy. Just a few days ago, I wore my spring jacket and walked around and today it snows. I said it many times and I repeat, I AM SO OVER THIS WINTER! At least it's the last day today and I will not miss it. 

When it's gloomy like today or any rainy day, I tend to crave more chocolatey stuff with a nice cup of earl grey. Chocolate dessert is always nice but especially on a day like today. Looking at these pictures makes me crave some. Cupcakes are cupcakes but this recipe uses Greek yogurt and it makes me feel healthier eating these cupcakes. A lot of times I substitute sour cream with Greek yogurt in many recipes. It's healthier but the main reason is, I always have yogurt at home but not sour cream. So, it's a win-win. 

These cupcakes are super moist and decadent, you will not believe there's no butter or just a little oil. And the frosting is one of the best fudge frosting I've had. So rich and silky.


I used the same pastry tip but tried different frosting technique on this one but I think I prefer the other way with this frosting. This type of frosting is very pretty with lighter color though. Like lemon cupcakes with spring flavored/colored frosting. Or cupcake in ice cream cones. I've done it in the past and those are adorable with this shape of frosting. 

Alright, I have been good today so far and now I can't take it anymore. I need to find something chocolatey to go with my cup of earl grey. =)

Greek yogurt chocolate cupcakes


Ingredients :

2 Tbsp vegetable oil
1/2 cup unsalted butter
1/2 cup semi sweet chocolate chips
3/4 cup + 3 Tbsp all purpose flour
1/2 tsp baking soda
1 tsp baking powder
1/2 cup unsweetened cocoa powder
3/4 tsp salt
1/2 cup Greek yogurt
1/2 cup boiling water or coffee 
1/2 cup granulated sugar
1/2 cup brown sugar
2 large eggs + 1 egg yolk
1/2 tsp vanilla

Frosting
1/2 cup unsalted butter, softened
3 cups confectioner's sugar
3/4 cup unsweetened cocoa powder
3 Tbsp Greek yogurt
3 Tbsp half and half
1/2 tsp salt 

Directions :

1. Preheat the oven to 350F and line the cupcake pan. In a small bowl, mix vegetable oil, butter and chocolate chips and melt, set aside. (either microwave or double boiling method)

2. In another bowl, mix flour, baking soda, baking powder, unsweetened cocoa powder and salt. 

3. In a large bowl, whisk together eggs, egg yolk, vanilla and both sugars until smooth. Add melted chocolate mixture and whisk until smooth.

4. Add half the flour mixture and half the yogurt. Repeat until all is just combined. Add coffee or hot water. Mix until just combined. 

5. Divide the batter among 12 liner in the cupcake pan. Bake for 16-18 minutes or until toothpick inserted in the middle comes out clean. Let them cool completely.

6. Meanwhile make the frosting - sift together sugar and cocoa powder. Mix Greek yogurt and half and half. Cream the butter till smooth and add dry ingredients and wet ingredients alternating. Add salt and beat the mixture on high for 1 minute. 

7. Frost cooled cupcakes and enjoy!

*Recipe by Baker by nature.

Tuesday, March 17, 2015

Bulgogi taco


Have you tried Bulgogi taco? There're two very well known Korean taco truck called Korilla in NY and Kogi truck in LA. I am sure there are plenty more but those are the only ones I know. And I have to say, bulgogi and taco is surprisingly totally delicious pairing. Savory, slightly sweet meat wrapped in soft tortilla. Yum. You can use whatever topping you like as any taco style but cucumber quick pickle is a go to topping for me. And apple slaw, I just stumbled upon it. I have always been using the same slaw dressing but usually I use either pear or daikon. I happened to have just apples that day and decided to give it a try and it is delicious!


If you want the bright red color of Korean slaw but don't want it too spicy, you can mainly use smoked paprika and a little bit of red pepper powder. That's what they do for little kids in Korea. I actually made a full on spicy version, thinking I just wouldn't give it to my tot but he insisted on having it and I just rinsed it off a little for him.

If you prefer milder version of bulgogi taco, you can use sriracha mayo instead of honey gochujang drizzle which Steve did. Traditionally, bulgogi's made with shaved ribeye and I used to make a trip to a Korean grocery store to make it but recently I tried cheesesteak meat and it worked out perfectly. 

If you feel like trying something crossover or fusion or just simply something different but yummy, bulgogi taco is a good fit!

Bulgogi taco

Printable recipe 

Ingredients :

About 12oz shaved beef(cheesesteak style)
1/3 cup bulgogi sauce
6-8 tortillas

Honey gochujang drizzle
1 Tbsp gochujang
1 Tbsp honey
2 tsp soy sauce
1/4 tsp sesame oil
2 tsp vinegar

Cucumber pickle
1/2 English cucumber, sliced very thin(about 1/16" if you can)
1 Tbsp sugar
3 tsp vinegar
1/4 tsp minced garlic
1 tsp salt

Apple slaw
1 medium sized apple or 2 small apples, julienned
1/4 tsp salt
1 clove garlic, minced
1 tsp sugar
1 1/2 tsp vinegar
1 Tbsp red pepper powder
1/8 tsp sesame oil(optional)
1 scallion green part, chopped(optional)

Directions :

1. Marinate shaved beef with bulgogi sauce and leave it in the fridge for at least 20 minutes.

2. Meanwhile, make toppings. Stir all the ingredients for honey gochujang drizzle well and set aside.

3. Cucumber pickle - Mix all the ingredients and add cucumber the last and toss well. Keep in the fridge for at least 30 minutes
4. Apple slaw - Sprinkle salt on the julienned apple and mix rest of the ingredients in another bowl. Toss the apple and slaw dressing together and set aside. 

5. Cook the meat in a pan for a few minutes. - As it's shaved, it cooks very fast. 

6. Warm tortillas and serve with all the toppings. 

* This goes very nicely with sriracha mayo too.

Friday, March 13, 2015

Blueberry pie pops


Tomorrow is pie day. Well it's actually π day. But any excuse to have some pie is acceptable. =) Pie day last year, we made these same blueberry pie pops and my tot very much enjoyed the whole process and of course eating them. This year, his skill is visibly improved! What a difference one year makes. It's amazing how fast kids grow and learn basic skills and fine motor skills. It's such a fun thing to make with kids, it's that simple.


You can even dip the finished pie pops in chocolate and sprinkles if you want to go that way. Very pretty and yummy too. But this time, I felt like simple sprinkle of sugar. With the scraps of dough after cutting out circles, I used a small star cookie cutter and cut them out as just crust bites. Kids love those little bites. 


I sometimes make them all pretty covered with paper straw and ribbon but rustic pie pops have its own fun way of beauty too. 

Blueberry filling recipe makes more than enough of filling for pie crust since you don't want to put too much filling on each pop as it might ooze out too much. You could double the crust recipe and make lots but if that's too much, you can just use it like jam. I usually use the leftover filling to dip some toasted bread sticks on another day. Try and roll out the pie dough on the thinner side, because you're not putting a lot of filling due to "oozing out issue", it might not be sweet enough if the crust is thick. 

Since this pie day falls on a Saturday, it's one activity to do at home with your kids! =)


Blueberry pie pops

*Makes about 10-12 pie pops

Ingredients :

1 sheet pie crust(store bought or homemade-recipe here )

Blueberry filling
1 cup fresh blueberry
1/4 cup sugar
2 tsp corn starch
1/4 cup water
pinch nutmeg and cinnamon
1 tsp lemon juice
1/4 tsp lemon zest

1 egg + 1 Tbsp water
10-12 lollipop sticks
1-2 Tbsp sugar to sprinkle(optional)

Directions :

1. In a sauce pan, stir sugar, corn starch, nutmeg, cinnamon and water and bring it to a gentle boil. Add blueberries and simmer for 3-4 minutes until thicken. Stir in lemon juice and zest and cool.

2. Preheat the oven to 375F. Line a baking sheet. Roll out the pie crust, cut out big enough size of shapes you like. 

3. Place a lollipop stick on a cut out dough and push it down to stick it but not all the way through. Place a dollop of filling in the center and brush egg wash around the edge and top it with another cut out dough. Crimp the edge with a fork.

4. Brush egg wash on top and sprinkle some sugar if you desire. Bake for 20 minutes or until golden brown. When done, cool it for a few minutes and enjoy! 

*They were still good the next day when stored in an airtight container.

*Blueberry filling adapted from cooks.com

Tuesday, March 10, 2015

Korean BBQ sauce


Today totally feels like spring. It just has been so brutally cold and snowy, it's anywhere above 40F? I'll take it! I love it. Except it still doesn't feel right to see piles and piles of snow outside. But I am definitely happier that spring is one step closer! Yay! 

And that means...I will be barbecuing a lot. No more, "mommy look at this, look at that, come help me with this toy!" while I'm cooking. I will be cooking outside and my tot will be either happily watering the herb garden or play ball next to me. Ah...I can't wait! 

So, when I barbeque, I frequently use Korean BBQ sauce. It's very versatile. You can make stew with it, bulgogi(shaved ribeye dish) with it, of course Kalbi(typical Korean bbq) with it or any meat dish you want. Korean BBQ sauce is our staple in the fridge. It makes really good stew, Steve loves it. We recently made bulgogi taco, which I will share next. With this sauce, it's a breeze to make it. Mmm..getting hungry.

Sauce thickens as it cools, so even if it looks runnier than you'd like when you turn the heat off, don't over reduce it or add more corn starch. Sauce/marinade is supposed to be slightly thick yet a little runny. 

Korean BBQ sauce

*Makes about 12oz


Ingredients :

1/2 cup soy sauce
1/2 cup water
2/3 cup brown sugar
1/2 pear pureed
2 cloves garlic
1/2 tsp ground ginger
1 1/2 tsp rice vinegar
1/2 tsp sesame oil
1 Tbsp water
1 Tbsp corn starch

Directions :

1. Mix first 7 ingredients in a sauce pot and bring it to boil on a medium heat. When it starts to boil, reduce the heat and simmer until reduced and thickened for about 12-15 minutes.

2. Mix water and corn starch together and stir it in the sauce. Let it cook for 2-3 minutes and let it thicken. Turn the heat off and add sesame oil. 

3. Cool the sauce and use it. Or store in an airtight container in the fridge.